How do I work with intake pre-screening questions
This article will tell you how to work with intake pre-screening questions.
NOTE: In order to access the Intake Prescreening Questions, the person setting this up must have the appropriate security rights to modify configuration.
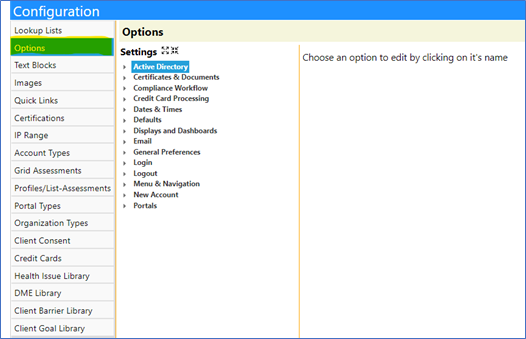
Accessing Configuration:
To create or edit Intake Prescreening Questions, you must be assigned to the proper Account Role which provides access to the system configuration screens.
NOTE: For the reminder of this document, we will assume the appropriate Account Role has already been established.
- Login to your imPowr website.
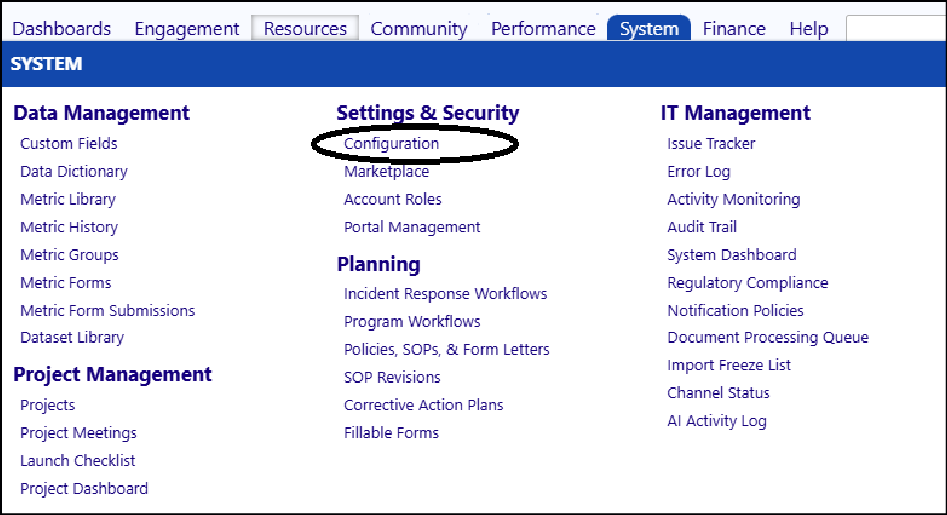
- Go to the System
- Click on Configuration in theSettings & Security

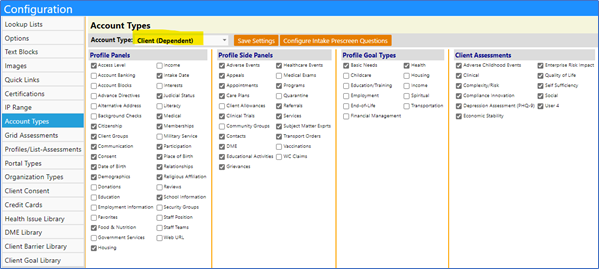
- Select Account Types from the list of options.

- Select the Account Type:Client (Dependent).
(NOTE: These steps will need to be repeated for each of the other Account Types.)
- Click on Configure Intake Prescreen Questions
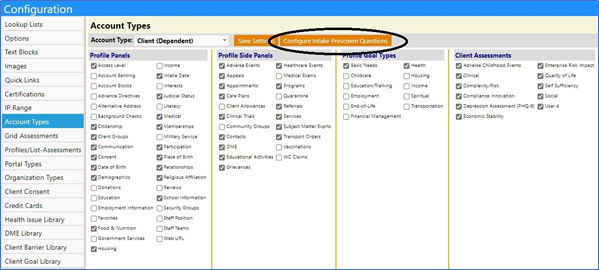
The Intake Question window opens…
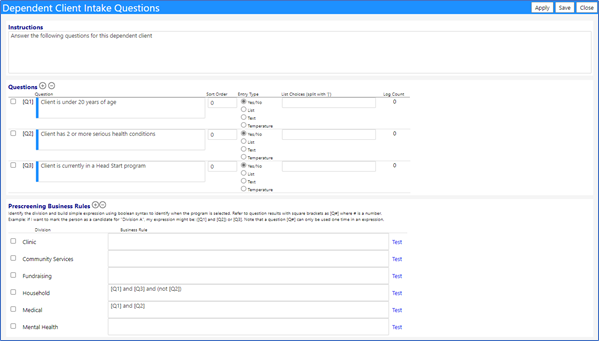
Fill out or Edit the Attestation and Questions:
The first section of this screen consists of instructions and questions.
- Enter your questions (select the question type and enter the list choices if the list type is selected).
- Set your sort order (the questions will appear on the page in ascending order – the smallest number on top, and the largest on the bottom)
- Click Save
NOTE: There are 4 types of questions which may be asked:
- Yes/No - For these kinds of questions, the Staff Member can only answer with a Yes or a No.
- List - These kinds of questions allow the Staff Member to select their answer from a drop-down list of answers. The drop-down list must be created for them in the set-up. Answers are separated by a pipe symbol (“|” found on the key above the Enter key on your keyboard). For example, to create a drop-down list of the letters A, B, and C, create the List Choice as A|B|C.
- Text - This kind of question allows a user to enter free text.
- Temperature - This kind of question allows the temperature to be manually input into the field – so there is a record of the temperature and it is kept as a record, similar to the Wellness Check tool. For Intake, this type of question is typically not used.
NOTE: You may add or edit questions at any time. You may only delete a question if no data has been collected for it. Please review the Log Count next to the question in the set-up page. If any number greater than ‘0’ exists, then data has been collected (i.e., the question has been responded to by someone) and the question can no longer be deleted (but it still can be edited and its sort order changed).
Pre-screening Business Rules:
The second section on the page refers to the Prescreening Business Rules. This section is used to automatically recommend a specific division and program for the new client, based upon their intake questions answers.
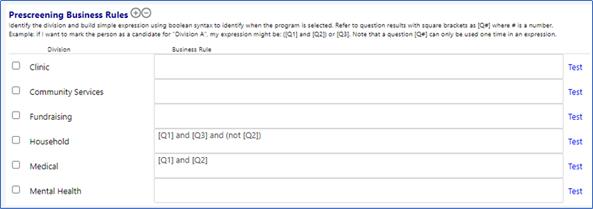
In the above example, If the pre-screener indicated a positive response for questions 1 AND 2, the tool would recommend a program within the Medical division as a potential program for the new client. Similarly, if they indicated a positive response for questions 1 and 3, but a negative response for question 2, a potential program within the Household division would be recommended. The Test button on the right hand side of the screen is used to test the logic you entered.
The use of Pre-screening Business Rules is optional, but highly recommended as a useful tool.
- Click on Save when you are completed with your instructions, questions, and business rules.
- Click on Save Settings for your Account Type to ensure your account panels are saved, as well.
Displaying Prescreening Questions:
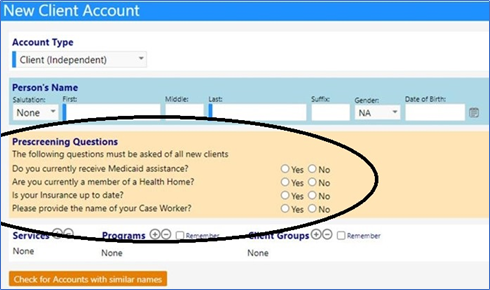
The Prescreening Questions display when you click on New Client in the Workflow (Dashboards > Summary Pages > My Home Page) or when you click onAdd when you are in the Client List (Engagement > People > Clients).
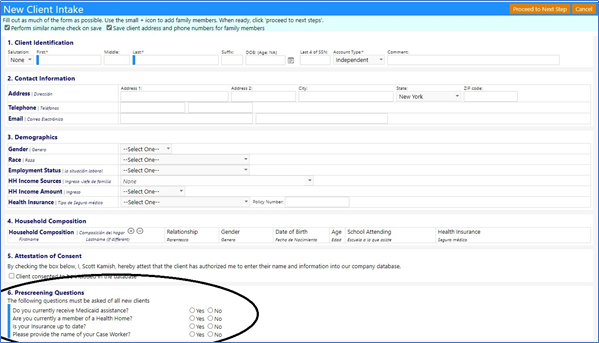
The questions appear in both the older New Client Intake Form:
…and the new Client Intake Form:
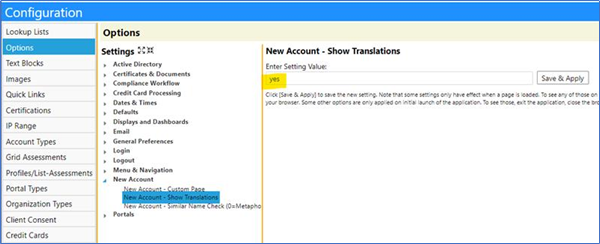
Activating the New Intake Form:
The New Intake Form is only available if it is activated in Configuration. The form, in itself, is NOT user configurable. Only the instructions and the Prescreening Questions are configurable. Additionally, most of the fields may also be displayed in Spanish (as seen in the previous screen capture).
NOTE: To activate the New Intake Form in Configuration, you must be assigned to the proper Account Role which provides access to the system configuration screens.
- Go to the System
- Click on Configuration in theSettings & Security
- Select Options.
- Select the New Account - Custom Page setting (under New Account Options).
- Make sure the Setting Value is set to “yes”. If not, enter “yes”.
- Click on Save & Apply.

To Activate the Spanish translation….
- Select the New Account – Show Translations setting (also under New Account Options).
- Make sure the Setting Value is set to “yes”. If not, enter “yes”.
- Click on Save & Apply.

Now, the next time you click on New Client in the Workflow, or click onAdd in the Client List, you will access the New Intake Form with Spanish translations.
Working With the New Intake Form:
The new intake form can be use to create individual Client accounts (Independent or Dependent clients) or a Client Family account. When you enter individuals into the Household section of the form, it will automatically create the Family for you.
Workflow
The steps involved with using the New Intake Form are as follows:
- Enter an individual’s name. This will be your primary client.
- Complete the intake form as much as possible.
NOTE: If you wish to create a Client Family, you may want to enter one of the parent’s names as the primary individual on the form instead of one of the family member children.
- Navigate to the Household Composition section:

- Click on the “+” symbol to add Family Member names to the form. Conversely, check the box to the left of the name and click on the “-“ symbol to remove that name.

- Enter the individual’s first name.
- Enter their last name (only if different than the primary person’s last name).
- Enter their relationship to the primary person on this Intake Form (Spouse or Child).
- Complete the remaining details as completely as possible.
- Click on the “+” symbol to add additional household members.

- Complete the Attestation of Consent by checking the box indicating the client consented to be included in the imPowr database.
- Complete the Prescreening Questions (user configurable, as previously noted in this document).
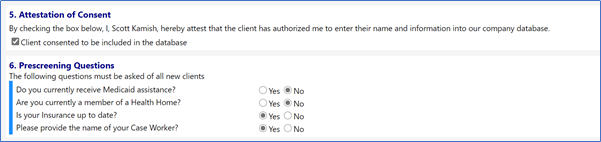
NOTE: _The prescreening questions are used to determine if any programs may apply to the client. _
- Click Proceed to Next Step.

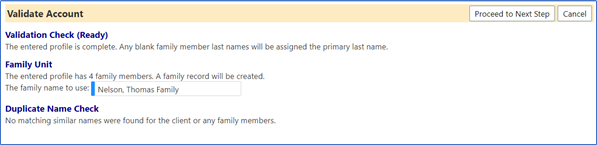
You will then be asked to review validate the actions which will be taken.
The Validate Account screen will identify what the new Family Name will be (you may change this, but it is recommended that you keep the name as displayed, because it will help locate the family during searches – because the searches are based on the last name). This screen will also display any potential duplicate accounts which may have been found in the system, with names similar to those you entered.
If no similar account name entries were found, you would get a message similar to this:
If there similar account names were found, you would get a message similar to this, where you would be asked to either to select either Create New Account Record or select from one of the existing accounts:
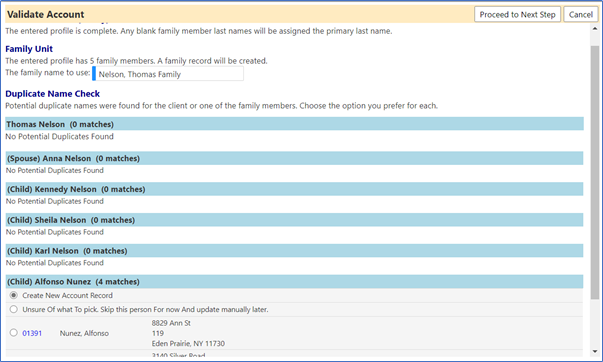
- Select the account you wish to use for the family member, or select Create New Account Record.
- Click Proceed to Next Step.
The Confirm Completion window will open and will inform you what actions will be taken by the system upon your confirmation.
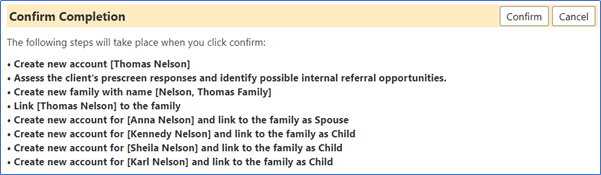
In this above screen capture, you can see a new account will be created (Thomas Nelson). Potential program referrals will be generated based upon the responses provided in the prescreener questions. Thomas will be part of a new Family which will be created (Nelson, Thomas Family). In addition to Thomas, Anna Nelson (Spouse), Kennedy Nelson (Child), Sheile Nelson (Child), and Karl Nelson (Child), will all be created and will be part of the Neleson, Thomas Family.
- Click Confirm to proceed.
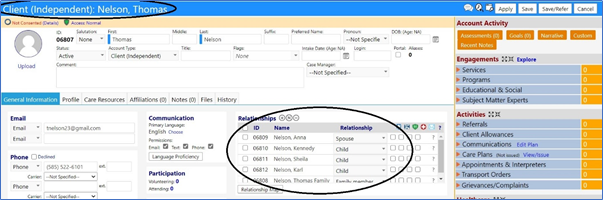
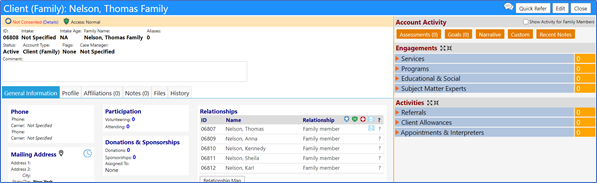
The people you entered will be created in the system as Clients as well as be included in a Client Family.


NOTE: If after a review of the accounts, you need to change the Account Type, when in the account, click on Edit and select the new Account Type from the drop down list of types. Be sure to Save your changes.
Associating Case Managers with the Family Account:
When Case Managers are involved…
- Access each individual’s account and add a case manager to their profile (e.g., the parent(s) and child(ren)).
- Complete the profile of each individual in the family.
- Click on Save before moving to the next individual.
When you do this, the case managers will all be associated with and will appear on the Client Family account, as long as the Case Manager Auto radio button is selected and the account is saved:
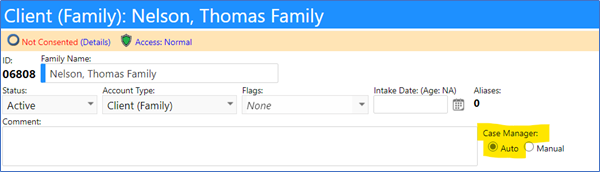
NOTE: _Although it is a shared family, and all the case managers will be listed and associated with the family, there can only be 1 case manager assigned to each individual family member – that case manager can be an individual or a team (reporting is done on that entity). _

Even though the family displays all Case Managers, each Family Member will only have 1 Case Manager assigned to them.